
HaloPSA Guides
Documentation to assist with the setup and configuration of the HaloPSA platform
Microsoft CSP Integration
Related Articles
- Single Sign On (SSO) For Entra/CSP Users and Agents
- Microsoft Entra ID Integration
- Azure Deltas
- Azure Consumption Billing (via Halo CSP Integration)
- Automated New Starter Requests into Microsoft Entra
0. Index
Please use the index to click to specific elements of the guide.
Please note, the first time you click you maybe redirected to another page rather than to the specific element of the article. Once redirected, this will work as expected. This is due to URL path structures in our portal and the numerous sources that point to our knowledge base. We are actively trying to find a more elegant solution.
1. Introduction and General Information
We strongly encourage you to read this guide from start to finish before you attempt to configure this integration.
The Microsoft Cloud Solution Partner (CSP) integration allows you to import all customers you have a Cloud Reseller relationship with and retrieve all license, user, and device information associated with each customer you additionally have a GDAP relationship with.
To do this, two separate app registrations must be registered in the CSP Partner’s Azure Tenant. This is a change from the previous 1 app registration model due to the introduction of GDAP by Microsoft.
The first (single tenanted) registration will connect to the Partner Centre and retrieve Reseller customers and their licenses.
The second (multi-tenanted) application will be created as an Enterprise app in each managed customer tenant and will allow the reading of users and devices.
This is a multi-tenanted integration, so you are able to connect more than one CSP-enabled tenant.
1.1 Basic Setup
To get started, navigate to Configuration > Integrations > Microsoft CSP, enable the module, and then click into the module to open the configuration screen.
If a default connection exists, rename it to something recognizable and input your CSP - Enabled Azure tenant ID.
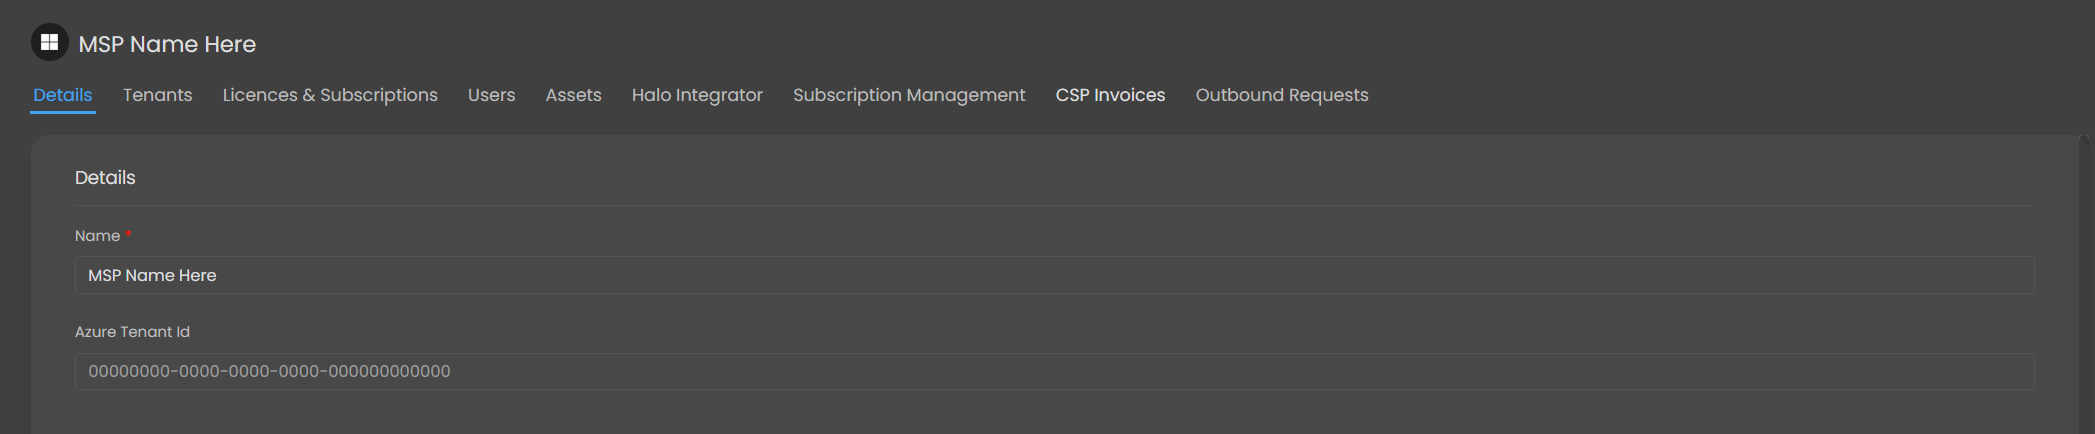
Figure 1: Part of CSP Details Tab
2. Partner Centre Connection
2.1 Single Tenant App Registration
To configure an Azure application:
- Open the Azure Portal or Entra Admin Centre
- Navigate to App registrations > New registration
- Give the application a recognizable name and select "Accounts in this organizational directory only (Single Tenant)"
- Enter the redirect URI, the URI needed will differ depending on the Halo version you are on, but the exact URI needed can be found on the CSP setup page.
- On versions prior to v2.200 the following redirect URI will need to be used: https://YOURHALODOMAIN/azure/auth
- On versions v2.200+ you the following redirect URI will need to be used: https://YOURHALODOMAIN/authcallback
- The API permission page should look like this once you are finished:

Figure 2: App Registration Registration Page
- Once the application has been registered successfully, you will be on the overview page. Copy the ‘Application (client) ID’ you see on the screen and store for use later.

Figure 3: App Registration Overview Page
2.2 API Permissions
Navigate to the API permissions tab:
- Remove the default 'User.Read' permission
- Permissions for all
- Click 'Add a permission', then select 'APIs my organization uses'
- Search for 'fa3d9a0c-3fb0-42cc-9193-47c7ecd2edbd' and select 'user_impersonation' and then 'Add permissions'

Figure 4: App Registration API Selector

Figure 5: Partner Centre API Permission Selection
- Click 'Add a permission', then 'Microsoft Graph', then 'Application permissions', then choose ' DelegatedAdminRelationship.Read.All' and finally 'Add Permission'
- If you don't need to complete the below, then your API permissions page should look as follows:

Figure 6: App Registration API Permissions (No Subscription Pricing Imports)
- Permissions for Subscription Pricing (Tier 1 /Direct Partners only)
- Click 'Add a permission', then select 'APIs my organization uses'
- Search for '4990cffe-04e8-4e8b-808a-1175604b879f' and select 'user_impersonation' and then 'Add permissions'
- If you have completed this section, your API Permissions page should look like this:

Figure 7: App Registration API Permissions (Subscription Pricing Imports)
Note: Failure to have your API permissions looking exactly as shown above will likely mean the integration will be unable to successfully authenticate.
Lastly, navigate to the ‘Certificates & secrets’ tab down the left hand side. Click ‘New client secret’, give it a description and choose you expiry value. Once created, copy the ‘value’ (NOT ‘Secret ID’) and store that with the Application ID we copied earlier. The single tenant app registration is now configured correctly in Azure.
2.3 Authorizing Connection in Halo
Now that the App Registration is set up and the relevant details are stored, return to the Halo’s CSP tenant configuration.
- Enter the Application ID and Secret (tenant ID should have been populated earlier)

Figure 8: CSP Details Tab
- Click Save
- You will then see an Authorize Application button
For successful authorization, the following conditions must be met:
- Must have access to the Partner Centre and the ‘Customer List’ and ‘Administer’ areas
- The account must have one of these GDAP roles for all managed customers:
- Directory Reader
- Global Reader
- User Administrator
- Licence Administrator
- Must complete Multi-Factor Authentication (MFA) using a strong method (TOTP/Authenticator App)
If successful, you will be redirected back to the CSP setup screen. All tabs should now be accessible and look like this:
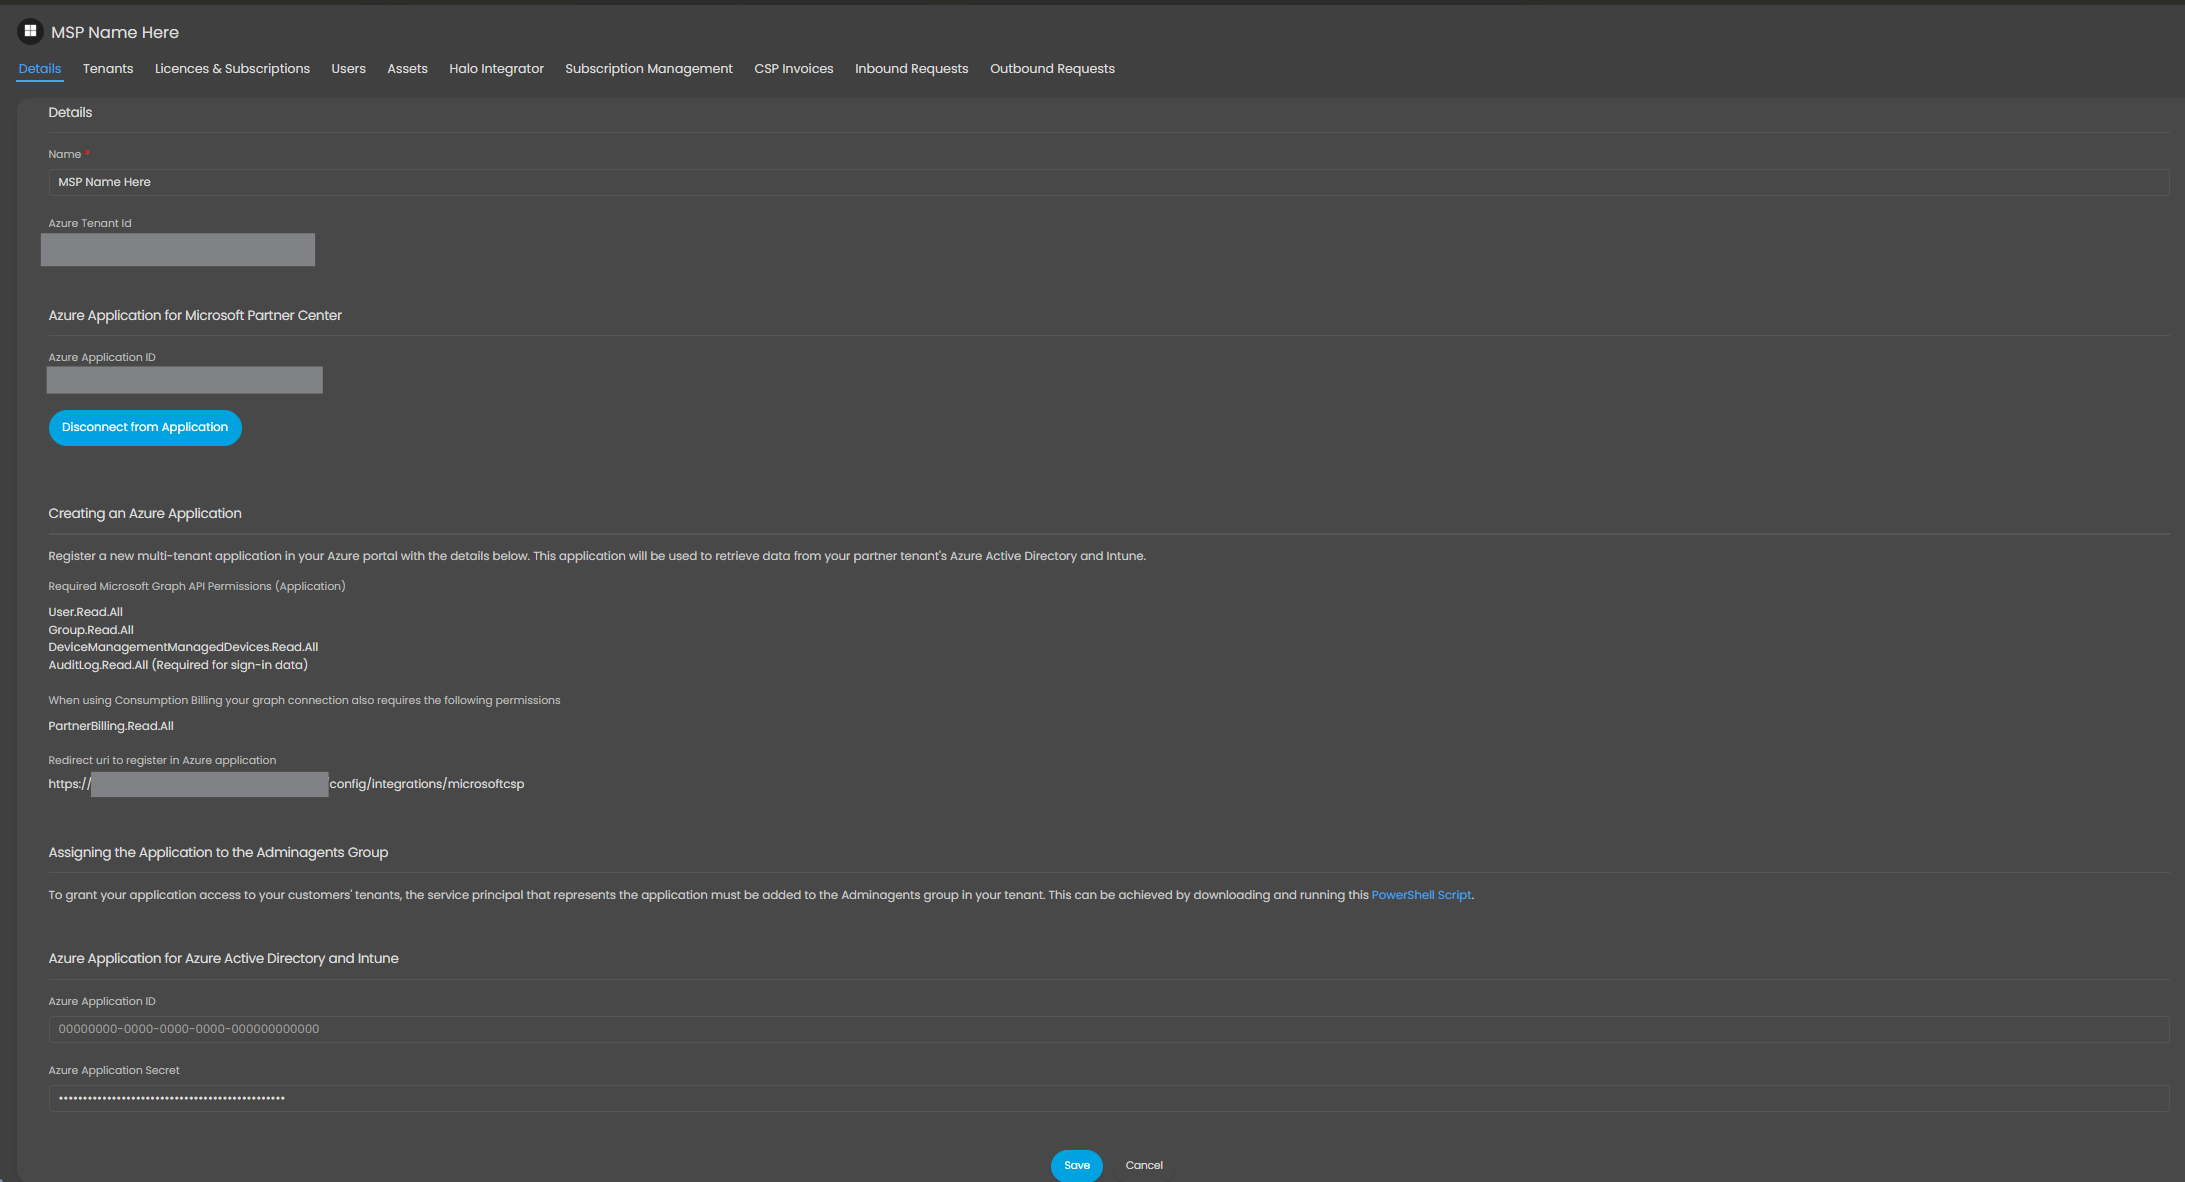
Figure 9: Post-Authorisation CSP Overview
3. GDAP Connection
3.1 Multi-Tenanted App Registration
- Go to Entra Admin Centre and create a new App Registration (Do not modify the previously configured application)
- Choose a meaningful application name
- When naming this app registration, it is important to note that this will be transferred into every managed/GDAP enabled customer’s tenant as an Enterprise App which internal administrators and possibly users will be able to see. It is therefore advised to make sure the name will not confuse (a common choice is MSP Name Service Sync)
- Ensure the app registration is multi-tenanted by selecting "Accounts in any organizational directory (Multitenant)"
- Enter the provided redirect URI from the Halo CSP setup page
Before completing registration, your screen should look like this:
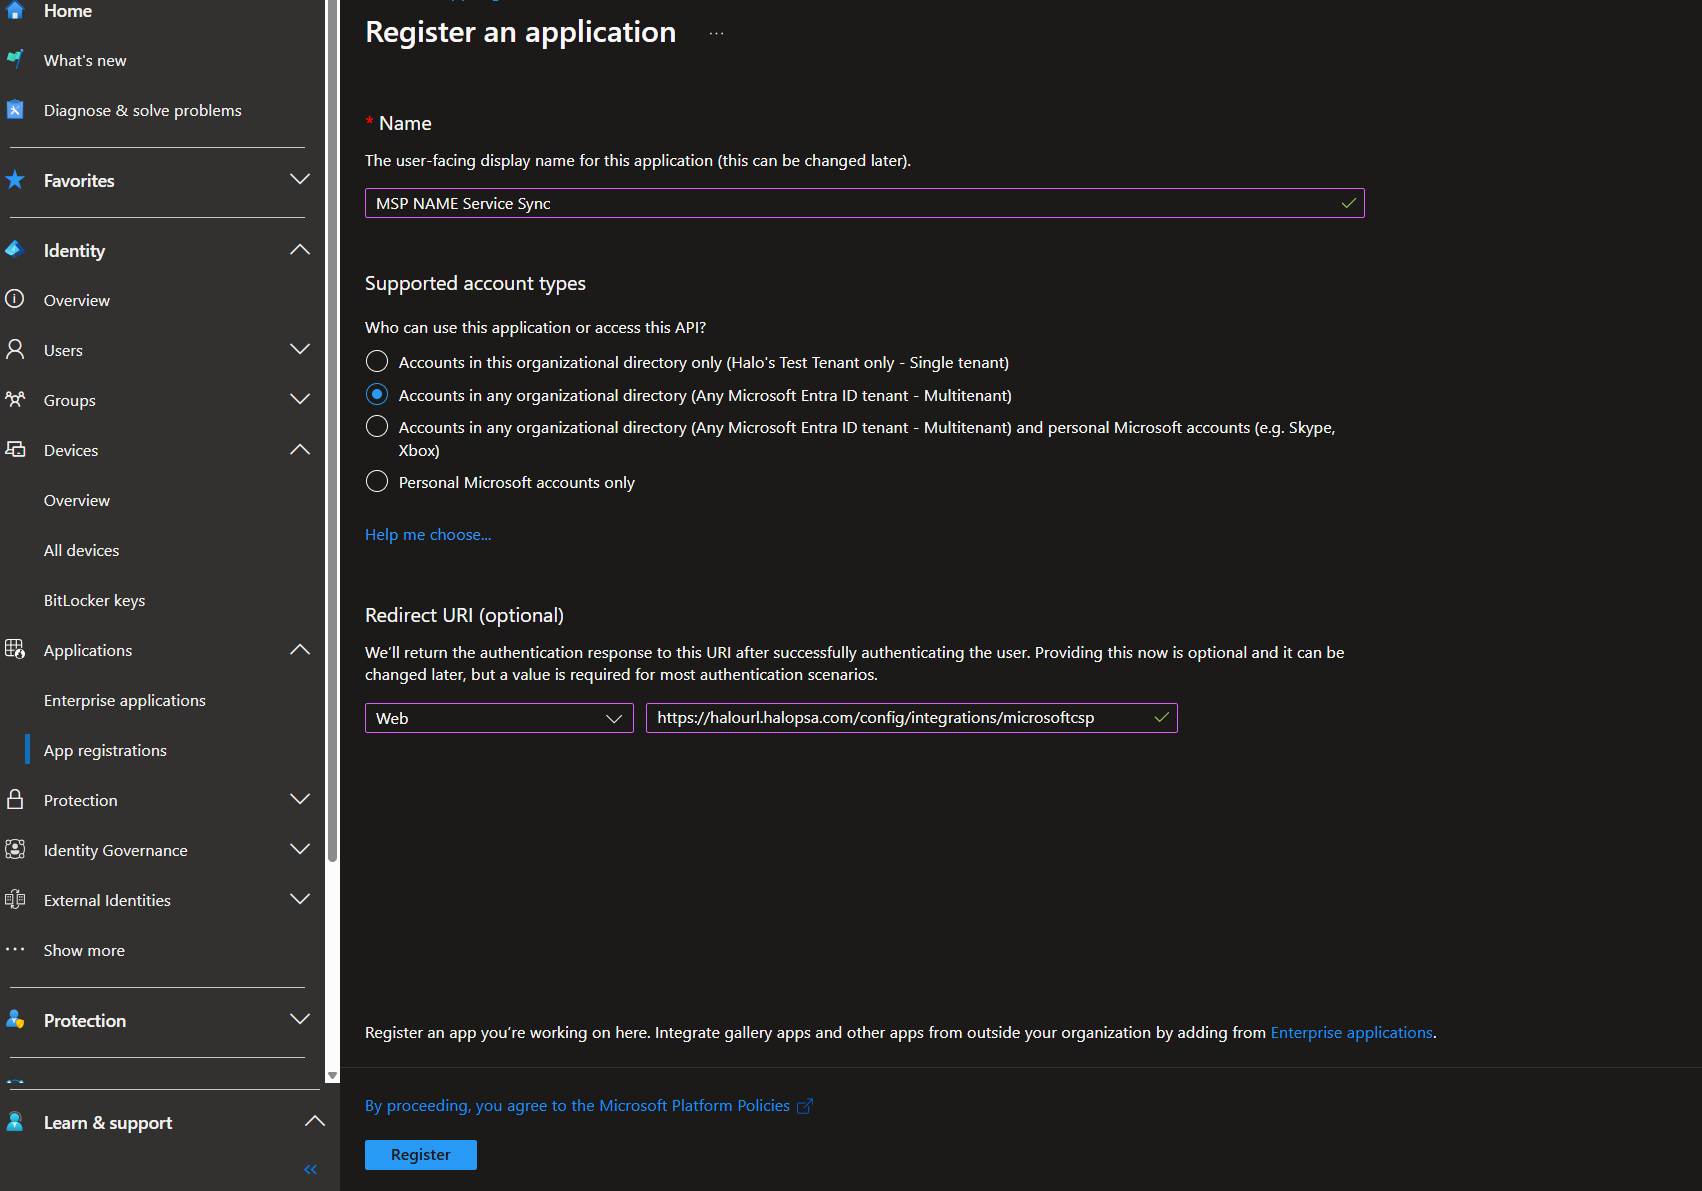
Figure 10: GDAP App Registration Overview Page
Once registered, as with the previous app registration, note down the Application ID and store safely.
API Permissions
- Navigate to the API Permissions tab
- Remove the ‘User.Read’ permission
- Click ‘Add a permission’
- Click Microsoft Graph > Application Permissions

Figure 11: Microsoft Graph API Selector

Figure 12: Application Permission Selector
- Add the permissions listed on your setup page
- If you plan on using our Consumption Billing functionality, you should additionally add 'PartnerBilling.Read.All' (Application).
- Note: Figure 13 cuts off the full name of the Permission, it should be: DeviceManagementManagedDevices.Read.All
- Your page should now look like this (The highlighted permission being mandatory only when Consumption Billing is enabled):

Figure 13: GDAP App Registration API Permissions
- Click ‘Grant Admin Consent for Tenant Name’ (requires Global or Privileged Role Administrator permissions as these are Application Permissions in the GraphAPI)
Once successfully granted, generate a client secret using the instructions previously provided in the Partner Centre section and store it safely for later use.
3.3 Elevating the Application's Permissions
Now that your multi-tenanted application has been created, you must elevate the permissions of the application so that it can access data in your customers' Azure tenants by adding it to the ‘AdminAgents’ Security group. You should be able to do this via the Entra Admin Centre but for some tenants PowerShell will be required. Both methods are detailed below:
3.3.1 Entra Admin Centre
- Sign in as a Group Owner, Group or Global Administrator
- Navigate to Groups > All Groups
- Search for and open the ‘AdminAgents’ group
- Click ‘Members’ and add the Application ID; your screen show look like this:

Figure 14: Entra Group Member Selection
- Once added, your screen should look like this:

Figure 15: Entra Group Membership Confirmation
- If so, add the Application ID and Secret into the following Halo fields and go straight to Tenants

Figure 16: CSP Detail Tab with GDAP connection fields highlighted
- If so, add the Application ID and Secret into the following Halo fields and go straight to Tenants
3.3.2 PowerShell
If you have been unable to add the App Registration into the 'AdminAgents' group via the Entra Admin Centre, then please use the following steps to do so via PowerShell.
- On a windows machine, open the PowerShell App as an Administrator

Figure 17: Opening PowerShell via start menu
- If you haven’t used the GraphAPI via PowerShell before, run ‘Install-module AzureAD’
- Once that has been successfully installed, run the below script where ‘{yourAppsID}’ needs to be replaced with the Application ID of the multi-tenanted App Registration you have just created
Connect-AzureAd $group = Get-AzureADGroup -Filter "displayName eq 'Adminagents'" $sp = Get-AzureADServicePrincipal -Filter "appId eq '{yourAppsId}'" Add-AzureADGroupMember -ObjectId $group.ObjectId -RefObjectId $sp.ObjectId- You will be presented with a modal Microsoft Sign-in screen: you will need to sign in with an account that has the right to modify groups (Group Owner, Groups or Global Administrator)
- Once successfully signed in, the script will run. Various errors can occur, some of which are detailed in the FAQ section
- You will be able to verify the script has worked by navigating to the ‘AdminAgents’ and seeing the App Registration in the members list as a service principal:
Figure 18: Entra Group Membership Confirmation
- You can now input the Application ID and Secret into the fields into Halo:
Figure 19: CSP Detail Tab with GDAP connection fields highlighted
4. Tenants
4.1 Mappings
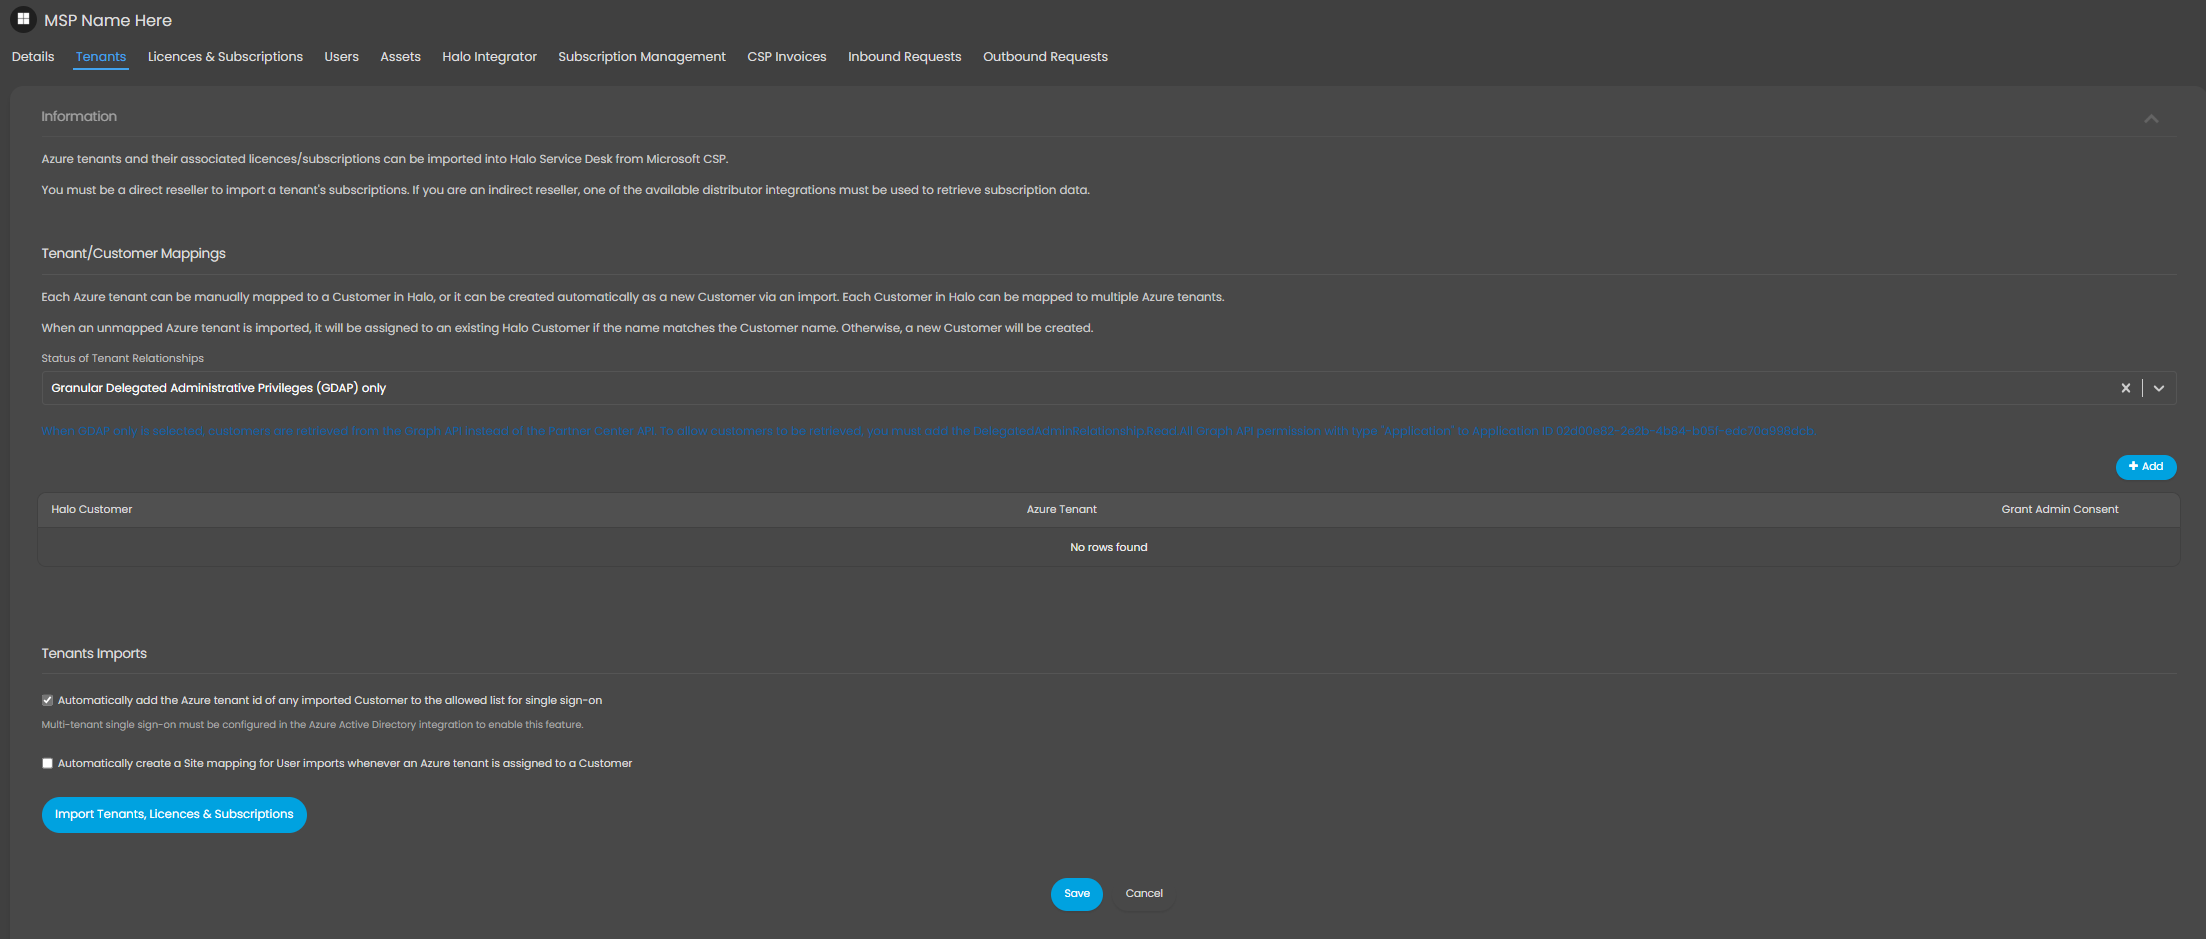
Figure 20: CSP Tenants Tab
The Tenant’s tab is used to map Azure Tenants to Halo Customers.
You must firstly choose the 'Status of Tenant Relationships'; GDAP and DAP or GDAP only (If you are on a version below this you will not have this tenant relationship status selection). If you are GDAP only, you should choose this option as it is faster and bypasses the requirement to have a reseller relationship with that tenant (An Admin Relationship is still required).

Figure 21: Tenant Relationship Configuration Options
You can now add mappings into the table by selecting the Halo’ customer (or *Do not Import*’ if you have tenants you do not wish to bring into Halo) and then the corresponding Azure Tenant. You have the option to override the Relationship Type and Licence Import Type (see licence tab section below for more info) at this point.
You may map more than one tenant to a Halo customer.
It is recommended that you manually map all customer to tenants unless you are sure the names match those already existing in Halo.
As of v2.200.1+, licences can be matched to users based on the tenant ID in addition to the client ID.
4.2 Additional Settings
- Automatically add the Azure tenant ID of any imported customer to the allowed list for single sign-on: Enables users to sign into the portal using their 365 credentials. Recommendation: Enable
- It should be noted that you can now bypass the tenant ID check when signing in with SSO so that all 365 users can use SSO by changing the 'Azure Tenant Sign-In Scope' setting within SSO configuration. This is further detailed within the dedicated guide
- Automatically create a site mapping for user imports when an Azure tenant is assigned: Automates user site mapping. Read the Users section before enabling
4.3 Granting Admin Consent
For all GDAP customers, a ‘Grant Admin Consent’ button will appear on the mapping table once saved.
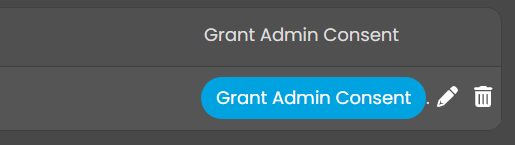
Figure 21: Admin Consent Button
This is an essential part of the process and is what will allow you to pull out the users and devices from your customer’s tenants.
Requirements:
In order to successfully complete a GDAP grant, the following requirements must be met.
- The Admin account used must be nativeto the tenant (not externally invited)
- For example, native means were created within and is owned by that tenant, so GlobalAdmin@managedcustomerdomain.com, NOT GlobalAdmin@mspdomain.com
- Must have permissions to create an enterprise app
- Must complete MFA authentication
When ready, click on button and you will be redirected to the Microsoft Sign-In screen, where you will need to use the credentials meeting the above criteria.
Once you sign in you should be presented with a screen like this:
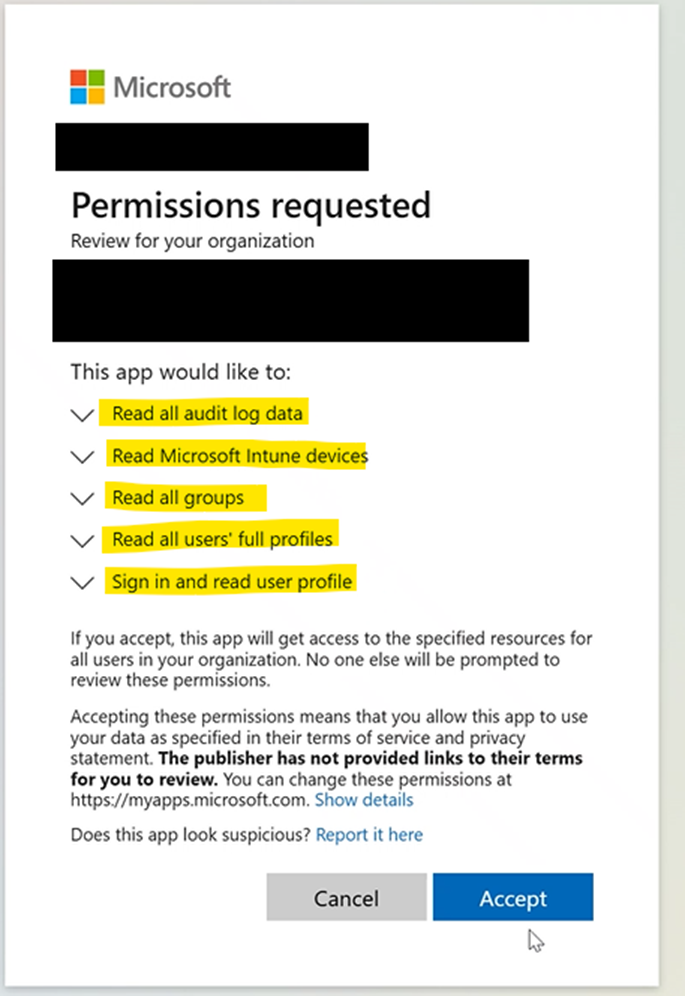
Figure 22: Expected Enterprise App Permissions Acceptance Screen
Click accept and you should be re-directed into Halo. The button will remain regardless of whether the grant was successful. Testing the grant will require you to complete the steps in the Users section.
It is recommended to grant consent to one tenant, complete the setup on the Users tab, test, resolve issues with admin consent (if they occur) and once happy with the process, repeat the admin consent for all relevant customers.
5. Licenses & Subscriptions
5.1 License Types
On this page, you will find configuration options for licenses and subscriptions.
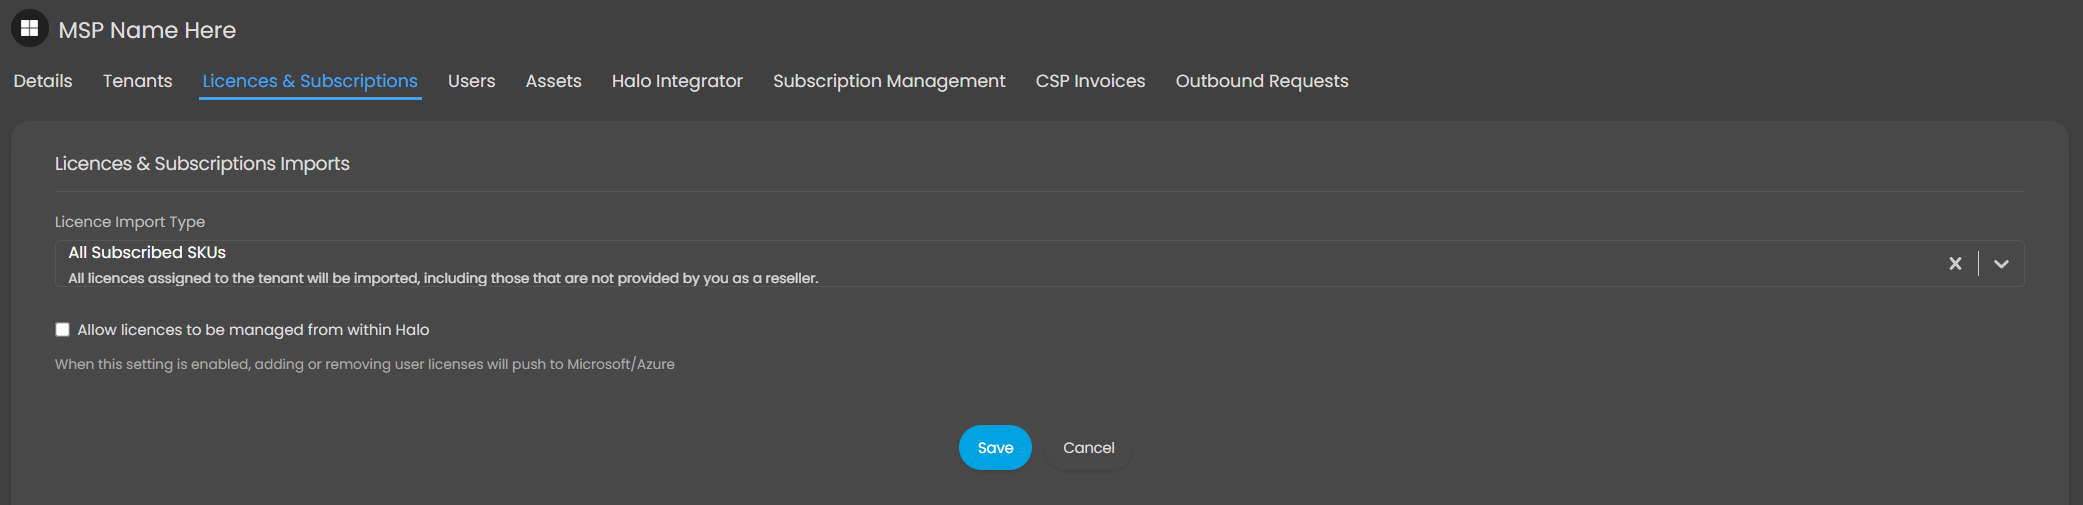
Figure 23: CSP Licences & Subscriptions Tab
There are two types of entity that we import from Microsoft; SKUs and Subscriptions. The broad differences are as follows:
- SKUs:SKUs are accessible to Tier 1 and 2 partners and contain a quantity and the users currently assigned to the licences. Used for invoice calculations and licence management (see below)
- Additionally, when Allow licenses to be managed from within Halo is enabled, adding or removing a user from a SKU in Halo will action that in Microsoft 365.
- Subscriptions: For Tier 1 (Direct) Partners only. Contains quantity, start and end dates, billing cycle, commitment period and pricing. Used for Invoice calculations and automated pricing changes.
According, we offering importing in the following configurations with the following target audiences in mind:
- All Subscribed SKUs: Default: all Tier 2 (Indirect) Partners must use this option
- Your Subscriptions: For Tier 1 (Direct) Partners with no indirect licence relationship customers and have no desire to manage licence assignment within Halo
- Your Subscriptions and SKUs: For Tier 1 Partners with indirect customer(s) or who wish to manage licence assignment within Halo
5.2 Subscription Pricing
For Subscriptions only, it is possible to import the pricing information. In order to do this, you need to ensure you have:
- Added the relevant permission as described in the Partner Centre Connection section
- Enable 'Subscription Pricing' and chosen the relevant Marketplace within the Halo Integrator section
Pricing data is imported on a weekly basis and stored: as subscriptions are created/updated the data will be queried and the relevant price and cost added to the subscription.
6. Users
All configuration for user imports is stored on this tab.
6.1 Site Mappings
The site mappings allow for control over which sites within Halo users are imported too. There are two different methods to set these up; generate or manually creating the mappings.
The ’Generate Mappings’ button allows a speeder setup of User imports but allows for less control (filtering and advanced mapping).
In most cases, generating the mappings and then manually modify the few more complicated customers (with multiple sites for example) if necessary is the best method.
6.1.1 Generating Mappings
In edit mode, you will see a ‘Generate Mappings’ button.
When pressed this will generate a mapping for every Azure tenant to import all users against the main site to which the tenant was linked. For example, If I map an Azure Tenant ABC Limited to customer ‘ABC Ltd’ in Halo, it would generate a mapping which would import all users from ABC Limited into the ‘ABC Ltd/Main’ site.
6.1.2 Manual Mappings
For customer that have multiple site, Azure Tenant or a large number of service accounts, you may wish to create the mappings manually.
- Click the ‘Add’ button on the top right of the mappings table
- Site Mapping Type:
- ‘Map to an existing Site’ is most common and below you will be presented with a list of sites to map to. Generally this will be ‘customername/Main’
- ‘Map to an existing Customer based on an Azure field’; allows for automatic site creation. When chosen, you will be prompted to pick the customer name only
- Click Save
- Once saved, you will be presented with various options:
- Filter Field: Only applicable to the ‘Map to an existing Customer based on an Azure field’; allows you to pick an user property that will create sites. I.e. ‘officelocation’; so when users are imported every unique ‘officelocation’ value will be created as a site under the customer and the user placed at their ‘officelocation’
- Apply filters to this Azure tenant: only relevant if you are mapping more than one tenant to a single Halo customer. If you are, you can use this to filter this mapping to only users contained within one of those tenants. Else, ‘All’
- Sequence: This controls the order in which the site mappings will be processed for import: the lower the number, the earlier it will be processed. Best Practice: set all mapping to the same number (50) initially and if you do need to process some mappings earlier than others, numbers can be adjusted either up or down
- Description Short description of this mapping; could be used to explain why you have mapped this customer in this way if multiple people administer these mappings
- Role for Users: Allows you to provision a user role against users in this mapping. See the separate guide on user roles for use cases and configuration instructions of these
- Azure Group Name: This allows you to filter the users imported to this mapping to a particular Azure group. A good use case is sorting users into their locations; a mapping to ABC Limited/London would be filtered to ‘Loc-London’ to ensure only users based in London appear at this site
- Include External Users allows you to include external users in the sync. Defaulted to unchecked
- Filters Alternative to Azure group filtering, you can instead uses properties on the user’s profile to evaluate if they should be imported. For example, ‘officelocation’ equals ‘London’
- Value allows you to set values for user fields if they are successfully mapped here. You can filter which users this value will be applied to based on azure group from v2.196+. When setting up the value mapping choose which Azure group you would like this value to apply to, if no group is selected the value will apply to all users imported in this mapping.
- Role for Users: Assigns roles based on mappings
- Include External Users: Enables synchronization of external users (disabled by default)
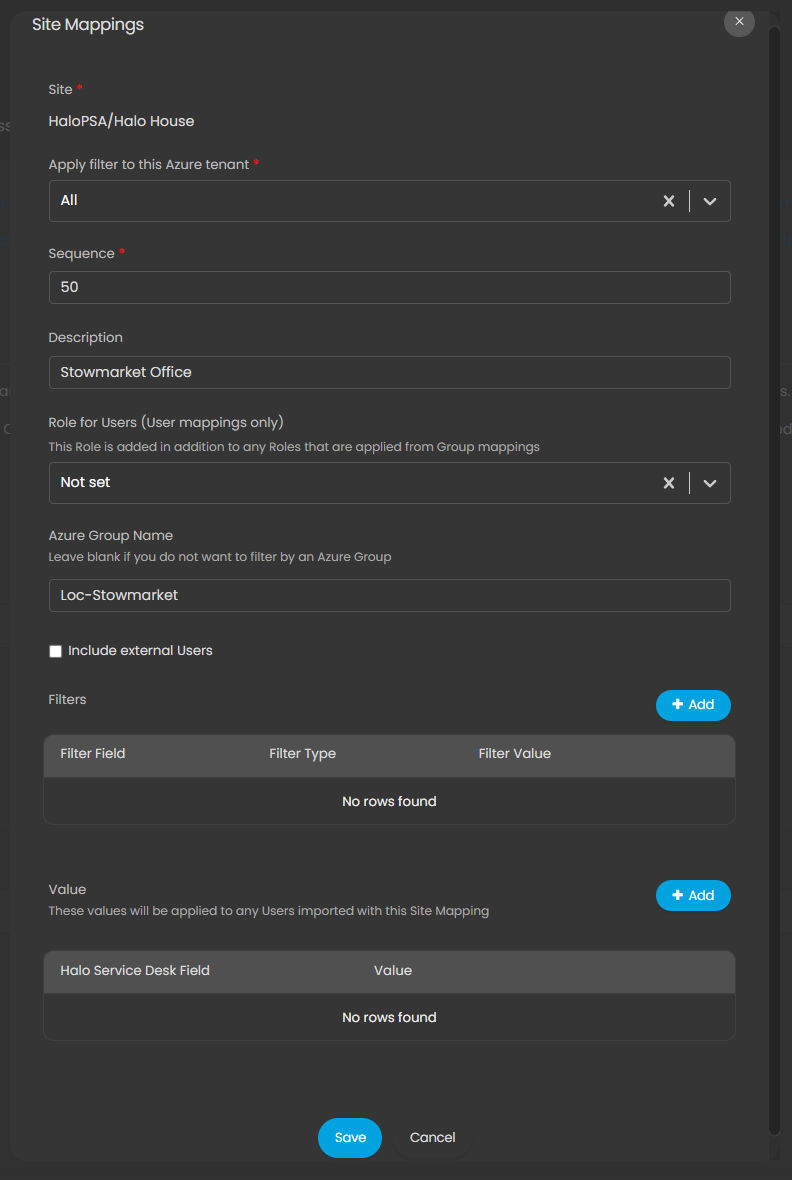
Figure 24: Exemplar Mappings for all users located at the 'Stowmarket Office' for a given Azure Tenant
When it comes to sequencing mappings, it is important to note that the most specific mappings should have a higher precedence (lower sequence number) than ‘Catch-all’ mappings without filters.
One way to avoid this problem is to ensure your mappings do not overlap, i.e. each user can only belong to one mapping at any one time (dynamic Azure groups based on office location field value is a good example here).

Figure 25: Exemplar site mappings table. There should be one row per tenant who's users and devices you wish to import
Finally, based on how many manual mappings you did will indicate whether you want to enable ‘Automatically create a site mapping for user imports whenever an Azure tenant is assigned to the customer’ setting discussed in the Tenants section.
This setting allows for an automatic generation of a mapping (like the Generate Mappings) button every time a new customer is mapped in the table on the Tenants tab. If Generate Mappings worked well for you, you should consider enabling this setting. If you did most or all of your mappings manually and plan to do so for new customers, leave this setting off.
It should be noted that customer’s can be automatically mapped in the Tenants tab under certain conditions (see the Halo Integrator section for more details) which may also influence your decision.
6.2 Field Mappings
Defines which Azure user properties are imported into Halo.
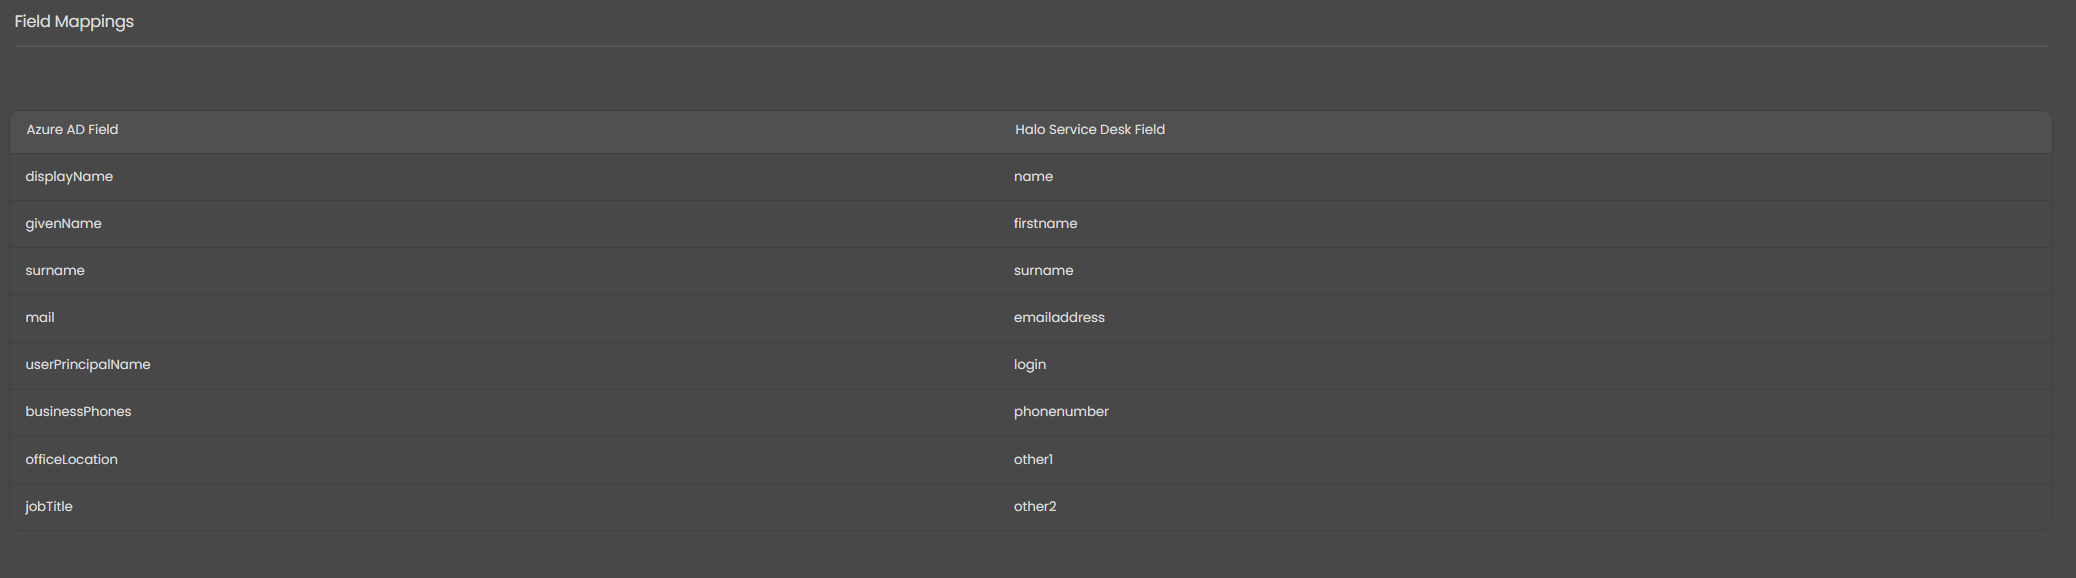
Figure 26: Azure AD field mappings to their nearest Halo equivalents
6.3 Imports
Additional settings for user imports.
- User Matching Fields: Default is Azure property ID, but email or network login can also be used.
- Set User/Agent status equal to Azure accountEnabled property: When enabled, ensures that disabled users in Azure are also disabled in Halo
- Import Users last sign-in date: Requires additional permissions (AuditLog.Read.All)
- Service Account Handling: Allows tagging users as service accounts (cannot have tickets logged aganist them nor be billed in user-caculated lines) unless they hold specific licenses
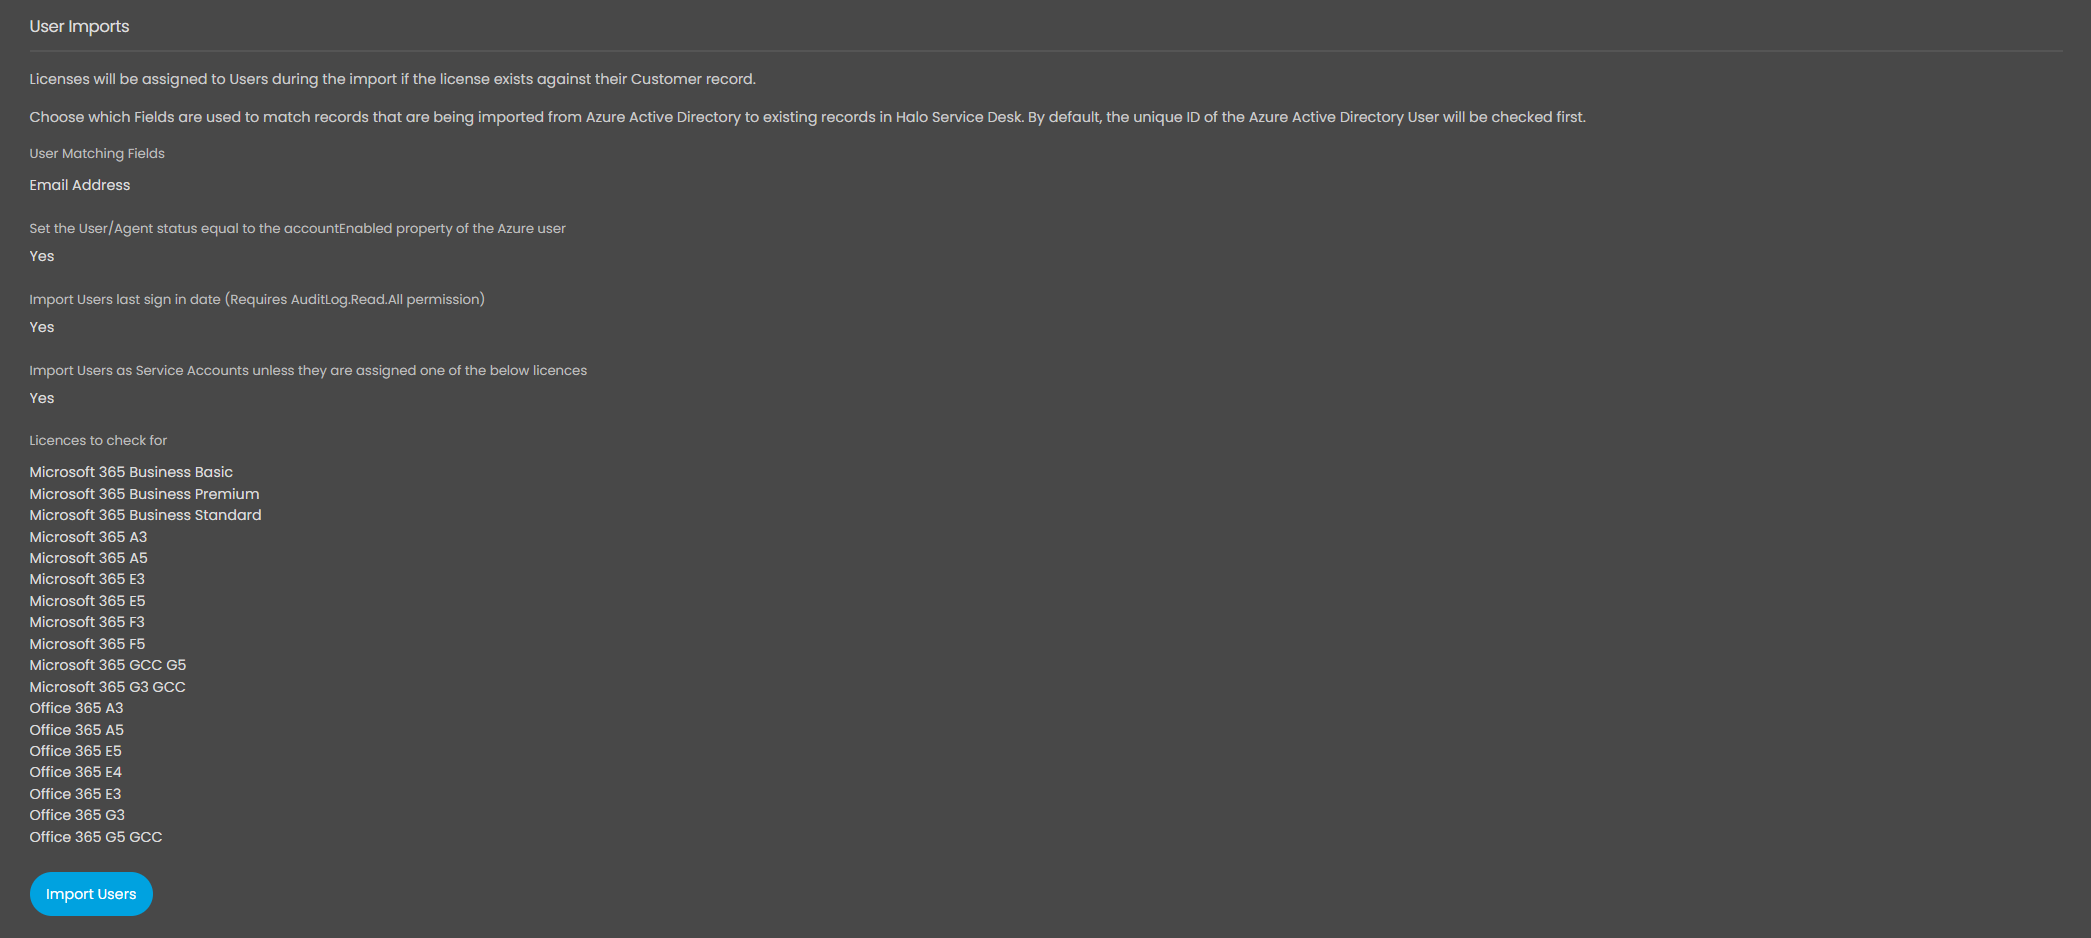
Figure 27: Exemplar User Import configuration
7. Assets
Controls how managed devices (Intune) are imported. Once enabled, all other configuration for Intune is enabled. Please move straight to the 'Halo Integrator' section if you do not wish to utilise this functionality.
7.1 Asset Types
Determines how asset types are determined.
- Use the same type for all assets: Assigns a single asset type to all devices from Intune
- Use an Intune field: Determines asset type dynamically from a specified Intune field
- Use rules: Classifies devices based on properties of your choosing with the option to fallback or exclude unmatched devices
For all of the above, you have the option to enable ‘Don’t update the Asset Type of existing Assets during import’ so that already existing assets type aren’t changed. This can be useful if you have a primary RMM and only want Intune to add extra information like complianceState without rec-classifying assets.
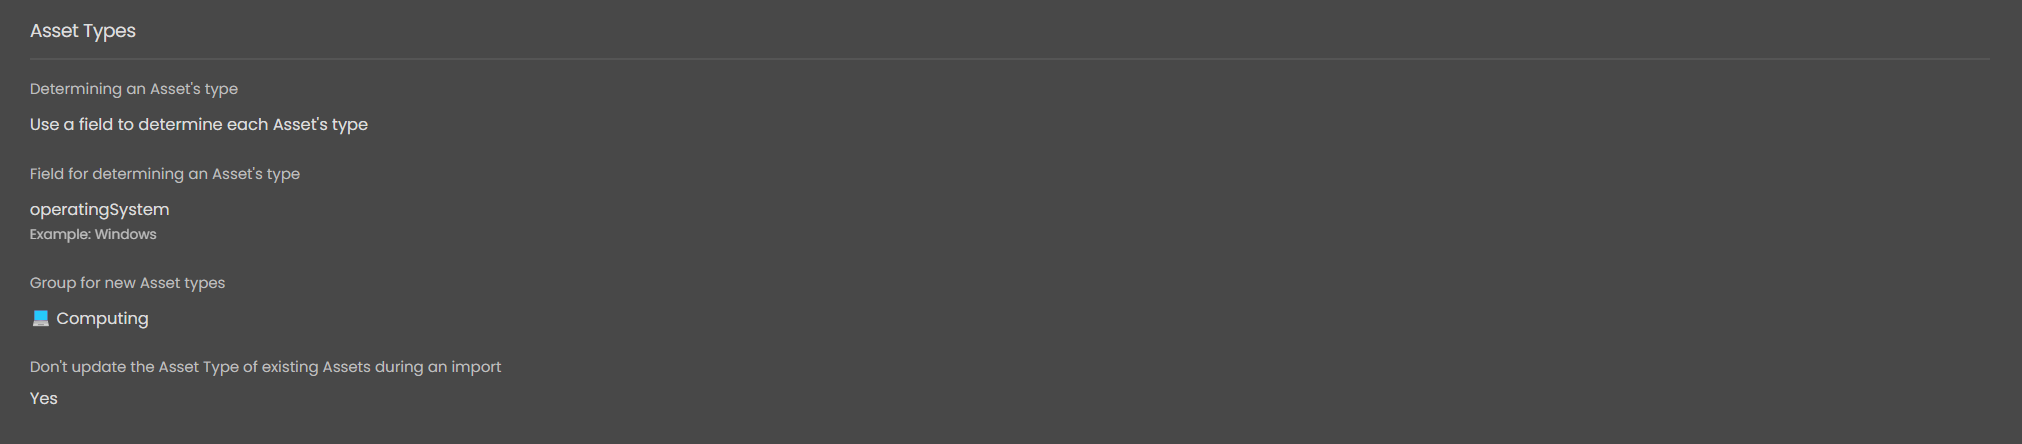
Figure 28: Exemplar Asset Types Configuration
7.2 User Matching
Controls how assets are linked to users.
- Asset method (Recommended): Matches devices to users during import of assets. You are presented with a choice of which field on the Intune device to use to match to the user
- User method (Older, not recommended): Links devices during user import by querying the managed devices linked to the user
7.3 Field Mappings

Figure 29: Exemplar Asset Field Mappings (most customers will map more)
7.4 Imports
The following settings are used to control how assets are imported.
- Once saved, you will be presented with various options:
- Default Site: When a device isn't match to a user during import, it will be placed at this site
- Asset Matching Field: The global asset matching field to ensure that multiple asset integrations update rather duplicate asset records. Recommendation: the field which contains asset serial numbers (generally ‘Serial Number’)
- Status of New Assets: The Halo asset status of new assets when they are imported
- Status of HaloPSA assets when the Managed Device has been deleted from Intune When a device is deleted from Intune, the asset’s status will be changed to this value
- Exclude Assets managed by Sense: Allows the exclusion of devices that are managed by Sense
Once all is configured and saved, the ‘Import Managed Devices’ button will appear at the bottom of the screen. Just like the User import, you can pick the site you wish to process rather than all.
An Exemplar is shown here:
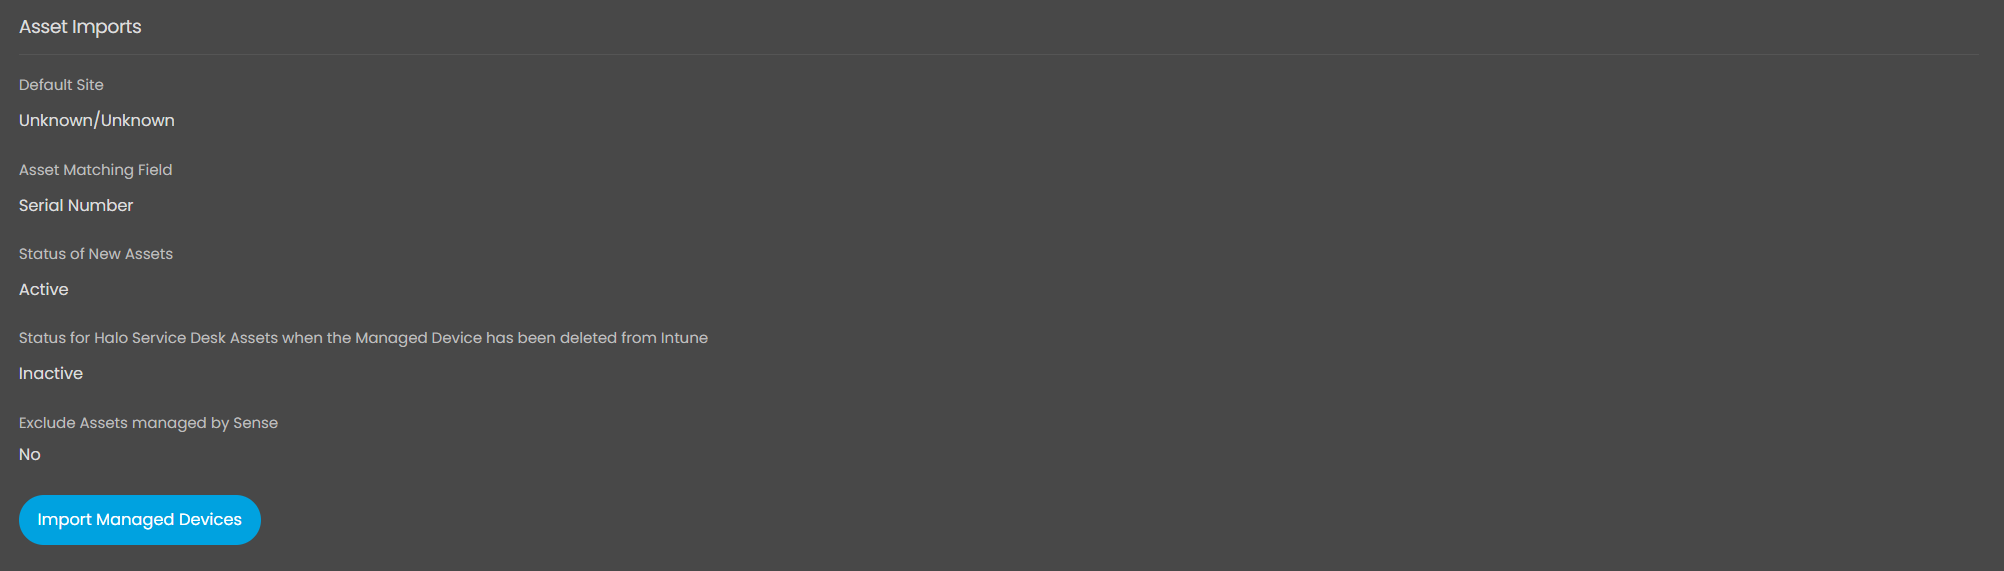
Figure 30: Exemplar Asset Imports Configuration
You need to have completed the Admin Consent section for the tenant(s) before attempting an import.
8. Halo Integrator
Configures automatic synchronization between Microsoft and Halo.
We recommend you only enable this once you are happy with your configuration.
8.1 Settings
- Enable the Halo Integrator: Enables synchronisation
- Select Modules to Import:Determines whether Tenants, Licences, Users, Assets,Consumption Billing and Subscription Pricing are Included. 'Azure Tenants' includes tenants and their licences
- The track (Stable or Beta) will determine which of these options you see.
- Marketplace to import: Only relevant for importing subscription pricing. Choose either GB or US Marketplace pricing to import.
8.2 Azure Deltas
Deltas allow for incremental syncs (just the changes since last sync) instead of full directory syncs; thereby allowing far more frequent syncing of changes from Microsoft. The main functionality is explained briefly below, but we strongly recommend you read our dedicated guide on Azure Deltas.
This functionality is currently in Beta. It also only works for users and groups: assets are excluded and will continue with a full directory sync.
This can be enabled by using the checkbox next to ‘Use Azure delta queries in the Halo Integrator (Users and Groups only) (BETA)'. The bottom option replicates the functionality of the full directory sync.
8.2.1 Reset Deltas
Deltas can be reset if changes are missed or are otherwise causing issues. There are two method to do this
- Reset Now: Forces a full sync on next run
- Get Latest Changes:Will get fresh Deltas when next syncing (so any changes between sync before and after reset will be lost)
Delta's can be reset by pressing the 'Reset Deltas' button on the integrator screen to apply to all tenants or for a specific tenant on the Tenants tab
8.3 Miscellaneous
- Create new customers from tenants (Halo Integrator only):when a new tenant is detected during a sync, rather than ignoring it the Integrator can create and customer with that name and add a mapping into the Tenants tab.
If using ‘Automatically create a Site mapping for User imports whenever an Azure tenant is assigned to a Customer’, then it can also create the site mapping after this, thereby making CSP setup semi-autonomous (Admin Consent is still manually).
Caution should be exercised: customer will be given the name of the Azure Tenant which may not be desired. Additionally, if the customer has already been created (by CRM process/other integration etc), this may create a duplicate. - Deactivate Users in HaloPSA when they are not found in CSP:Will get fresh Deltas when next syncing (so any changes between sync before and after reset will be lost)
9. Subscription Management
9.1 Adjusting Quantities
You must be a direct reseller to use this option.
When enabled, an extra button titled 'Adjust Quantity' is shown on subscriptions from CSP. Using this will action the change in the Partner Centre and will be reflected there after a short delay. Separate guides exist explaining the functionality and usage of subscriptions.
9.2 Webhooks
By enabling webhooks, Halo will accept updates to licence quantities (not enacted from Halo) from the Partner Centre, rather than waiting until the next Halo Integrator sync.
There will be a delay as processing within the Partner Centre is not instantaneous.
10. Single Sign-On (SSO)
To set up SSO you will need to set up the Entra integration with multi-tenancy SSO provision.
Provided you have checked the ‘Automatically add the Azure tenant id of any imported customer to the allowed list for single sign-on’ or allow all Tenant IDs to use your SSO, no further configuration is required.
You can force SSO in the user portal per client/customer by enabling "Redirect to Single-Sign-On option when attempting to log in with Halo credentials" in the customer profile > Settings tab > Self Service Portal dropdown.
11. Consumption Billing
Consumption Billing functionality allows you to import usage data (VM hours/GB used) from your customer's tenants and map it onto Halo Recurring Invoice lines for automated billing.
If you are using this functionality, please ensure you added the relevant permission within the GDAP Connection setup. All further configuration for consumption billing is contained within its own article.
12. Errors and Logging
12.1 Logging
12.1.1 Inbound Requests
The Inbound Requests tab tracks some of the incoming requests and changes (changes from Microsoft to Halo). Individual requests, their processing record and outcome can be viewed from here.
12.1.2 Outbound Requests
The Outbound Requests tab tracks some of the outgoing requests and changes (changes from Halo to Microsoft). Individual requests and their response from Microsoft can be viewed from here.
12.2 Common Errors
| Element of Integration | Error | Cause | Solution |
|---|---|---|---|
| Tenants | Unable to authenticate Single Tenant Azure application in Halo and receives an error stating that the requested permissions do not match those setup against the application in Azure, or they are immediately redirected back to the Azure login screen after authorizing. | The permissions added to the Azure application are not correct. This is commonly setup incorrectly for the user_impersonation scope. | There are two very similar looking but actually different permissions to the partner centre. Make sure that the user_impersonation scope is for the Microsoft Partner Center, and has a description of Access Partner Center. This one is right: This is wrong: The most reliable method to get the correct permissions is to search by the ID of the API. Once, 'Add a permission' has been clicked within the App Registration, click 'APIs my organisation uses' and enter this code: 'fa3d9a0c-3fb0-42cc-9193-47c7ecd2edbd' |
| Tenants | 'Error - Forbidden' or customer records missing from the sync. | The account you authorised the Partner Centre connection with does not have access to customers or the Cloud Reseller Relationship has been requested/has expired. | All Tenants Missing: Log into the Partner Centre directly with the credentials you authorised with in Halo and try to load the 'Customer List' section. If it loads, this isn't the issue. If it doesn't, you need to modify this users permissions, log out and back in and check again. Some Tenants Missing: Your Cloud Reseller Relationship is either missing or expired. Please review and try syncing again when the relationship has been re-established. |
| Licences | 'Error - Forbidden' | The account you authorised the Partner Centre connection with does not have access to licences against the tenants. Or The user that has authorised your connection to the partner centre has been flagged as a 'risky user' by Azure. | Check the tenant that you have used to create a (multi-tenanted) application to authorise the CSP integration with, has access to your customer's licences. Alternatively, contact Microsoft support to have your permissions elevated. Or Log into your Azure (the parent tenant) and navigate to the user account you used to authorise Halo's connection to the Partner centre, check if the user has been flagged as a risky user. If they have you will need to complete the steps to remove the risky user flag. |
| Tenants | Redirect URI specified does not match redirect configured | The redirect URI specified in the app registration has not been correctly configured | Please refer to the instructions and correct the Redirect URI within your Azure application(s) |
| Users & Devices | Insufficient Privileges | Multiple | Check you have used Application (and not delegated) permissions on your Multi-Tenanted Azure Application. Please also review the GDAP relationship with that tenant: ensure that it is active, with the relevant Admin roles and the 'Adminagents' group has access to those roles. |
| Users & Devices | The identity of the calling application could not be established'. OR Failed to retrieve users - Token refresh failed - invalid_client - AADSTS7000229: The client application X...X is missing service principal in the tenant Y...Y. OR AADSTS700016 Application not found in the directory when logging in | Admin Consent has not been successfully granted. More formally, an Enterprise Application has not been correctly provisioned within the tenant. | Please re-read the Admin Consent section of the guide and ensure that you have correctly:
You can also try logging into the tenant directly with the admin account you are trying to authorise with and grant Admin Consent to the Enterprise App manually |
| ALL | Token Expiry | Your secret has expired | Your will need to use the instructions provided in this guide to generate a new secret and replace it within the correct section of the integration. If related to your Single-Tenanted app registration, you will ned to disconnect to replace the secret and then re-connect. |
Popular Guides
- Asset Import - CSV/XLS/Spreadsheet Method
- Call Management
- Creating a New Application for API Connections
- Creating Agents and Editing Agent Details
- Departments and Teams
- Halo Integrator
- Importing Data
- Multiple New Portals with different branding for one customer [Hosted]
- NHServer Deprecation User Guide
- Organisation Basics
- Organising Teams of Agents
- Step-by-Step Configuration Walk Through